I admired a ton (or is it tonne?) of alphabet prints when I was preggers. The plan was to purchase a print for the Rockstar once he arrived but we never got around to it. The more I thought of it the more I disliked the idea of spending money on something that I knew would be easy to make on my own. Now I'm picturing Mike shaking his head and saying something about me being frugal followed by "I'd rather you were frugal than shopping for Gucci".
Anyway, since my favourite photo editing site Picnik can be used for so much more than photos I figured I would try to make some printables over there. If you've never used Picnik you MUST try it out: it's perfect for invites and cards (I'll be showing you the Rockstar's first birthday invite soon), creating freezer paper stencils and transfers (I haven't used it for either but I have plans to do so), and of course creating hangable art. I used the free bits for at least a year and just purchased a premium account a few months ago - the extra features with the premium account are great and I received a free book through Snapfish when I signed up which actually cost more than the year subscription.
Back to the point of this post! I finally took some time a few nights ago to play around and I made up an 8 x 10 alphabet print.
Once I had created one version it was easy to go back and change the background and font colours and of course change the names.
The first letters on the lines the four letter names are on don't sit in the right place according to my eyes but I figure these will be framed and the letter will be cut off anyway. We'll see... I have to pick up a frame and print one to see how it looks.
I did create one for The Rockstar but I'm not sure whether I'm going to print it on paper to hang or on iron-on transfer paper for him to wear. Decisions, decisions!
I think these would make great new baby presents and I also thinking they would be cute transferred on to little tote bags for kids to use as library book bags. Maybe that's what I'll do with the Rockstar's.
May 19, 2011
May 17, 2011
Tiny Tasties
I'm super proud of both of my parents. They have been working hard for the past few months to lose weight and both of them look fabulous!! More important than how they look is how they feel and they are both feeling fantastic!
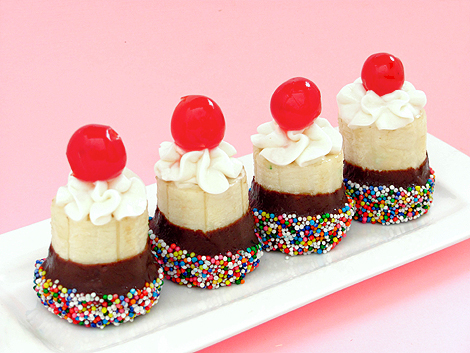
It certainly isn't easy to lose weight and anyone who has tried knows how important it is to indulge every now and then in order to avoid an all out binge on a really crappy day. Someone (and for the life of me I can't remember who) linked to these super sweet treats which led to the recipe for the cute and delicious looking Banana Split Bites pictured above and a new-to-me awesomely yummy blog Bakers Royale.
I haven't taken the time to figure out how many points each would be (my parents are using the Weight Watchers point system) but I think that it would be minimal and even less if I substitute frozen yogurt for the ice cream. I remember my mom ordering banana splits from Dairy Queen when I was little and although I haven't seen her eat one in years I have a feeling she would share a couple of these with me if I made them. I'm looking forward to giving this sweet little treat a test run once the weather warms up again.
There are a pile of recipes that make me go "YUM!" over at Bakers Royale but of course the most yum inducing for me involves a chocolate peanut butter combo.
image source: Bakers Royale
Frozen Reese Peanut Butter Pie: I am holding back tears of joy while thinking about the yum factor. Oreo cookie crumb crust?! Seriously. Genius. Naomi mentions that you can make four mini cakes or one large one. Of course the mini cakes would mean less waste. Hahahahahaaha! Who am I kidding?? Waste? I could scarf back this cake all on my lonesome and I'm sure I could find a few people to share it with if I decide to skip the terrible greedy girl bellyache.Check out Bakers Royale and leave a comment linking to your favourite find if you feel the urge to share!
May 15, 2011
Boing
Spring finally sprung around these parts; we've had loads of rain and a fair amount of sunshine. The Rockstar was showing off his chunky little legs in a pair of shorts on Friday while I donned a tank top and now it's chilly again and he's sleeping in a fleece sleep sac with his window shut tight. At least we have had a taste of warmth and know that it really isn't too far out of reach now.
Once again I forgot to post my entry for the Iron Craft challenge. The theme was Spring and with Mother's Day falling during the challenge week it was a perfect excuse (not that I need one) to make a little something for one of my very best friends: my unbelievably amazing mom.
My mom loves birds and my parents backyard is a little oasis for them so I thought a birdhouse would be the perfect gift. I learned my frugal ways from my parents so she was pleased to hear I scored the unfinished bird house from the dollar store.
I was ready to hit Michael's to purchase some decals but found some that were just perfect for this project in the same shop I found the house in.
I used three coats of tung oil (left over from the deck project last year) to finish the houses and then applied the decals. I finished the houses off with a couple of coats of spray-on clear finish meant for outdoor projects. There is one step I didn't think of but thankfully my dad did so I've taken the house back for a few days in order to get this done: drilling holes in the bottom of the house to let any water/waste escape.
I have two more houses waiting for me to tackle them. I bought some funky shape decals to use on the one that will hang in our backyard: here's hoping it will attract some pretty birdies for the Rockstar to admire.
Speaking of moms I didn't get around to posting on Mother's Day! I hope all of you fabulous Mamas out there had a lovely day! A special Happy Mama's Day to my superfantabulous mom Lois and my amazingly awesome mom-by-marriage Bridie.
I was spoiled with sleeping in, a yummy brunch, coffee on the deck, an afternoon walk, swings, chocolate peanut butter, a beautiful photo FAMILY photo frame and a delicious bbq dinner: an absolutely wonderful first Mother's Day. Two cards, one from my baby boy and one from my big boy made me sniffle. Love and hugs and smooches to my two boys for making my day perfect.
Sunny Resort Blouse Take 1
I finally got around to snapping a few pics of the shirt I made for myself using the freebie pattern from Adey of The Sew Convert found over at Grosgrain. I would certainly use this pattern again but I would choose a more flowy fabric like she suggested. I went with a quilting cotton for my first attempt because I didn't want to spend a pile of money on fabric to find out that the style didn't suit me.
I learned a few things while making this puppy:
1) Use double sided bias tape for the edging. The nasty woman I dealt with at the fabric store looked at me like I was an idiot when I asked whether she recommended single or double sided so I (stupidly) took her snapped advice of single sided. I'm not sure if you can tell from the photo but I used the single sided to edge the neck and it's wrinkled. I spent ages online trying to find a tutorial for using single sided bias tape after the neck difficulties and found nothing. In the end I found a few packages of double sided bias tape in my stash and used that for the rest of the shirt and five minutes later it was finished: easy peasy! I should have ripped out the neck and edged it with the double sided tape but oh well.
2) Remember to consider shrinkage when deciding how much fabric to purchase. Duh - this seems like an obvious thing to do but I didn't think of it. Thankfully I had a bit of cute purple fabric in my stash that worked out perfectly for adding some length to the shirt (actually I'm happy the oops led to this addition, I think it adds something to the finished product)
3) Don't make the belt and belt holes. I debated whether or not to add the belt and in the end I made one and added the holes to the shirt and I shouldn't have bothered. The belt looks super cute on Adey but it does nothing for my shape -- should have followed my gut on this one. Thankfully the pattern on my shirt hides the button hole belt loops pretty well so I can still wear it without the belt.
I would highly recommend this pattern to beginners. Super easy to follow instructions and a relatively quick start to finish project.
Labels:
clothing,
other people's crafty bits,
she's crafty
Subscribe to:
Posts (Atom)