Showing posts with label tutorials. Show all posts

April 26, 2011

Oh My!! Free Patterns!!

Mmm Grosgrain. I wish I could create patterns and sew clothing like Kathleen; she is one talented woman! I used to visit her blog often to gaze at her beautiful creations but I've been neglecting my regular reads for months and months and... you get the picture.

Thankfully Jennifer from All Things Belle (a new regular read of mine that I'm actually reading regularly) mentioned Grograin in a recent post which reminded me to slip over for a peek and WOW have I been missing out. There is so much yummy eye candy I need to gobble up! I'm loving the new regular features Kathleen has come up with and can't wait to see what fabulous bits she has in store.

The best part of popping over to Grosgrain now is that it's Free Pattern Month which means tutorial central!! One of the patterns from Day 1 shared by The Sew Convert is for a super funky blouse that looks totally doable!! It's time for me to FINALLY make a piece of clothing for myself. I need to find the right material for this project but have a feeling it will take me a ridiculous length of time to pick it out. Hmmm... tomorrow the Rockstar is going to his Granny's to be spoiled for the day. The fabric store is between the stable where I'm volunteering in the morning and my house; I might have to make a pit stop on my way home. I'll let you know how it goes.

Looking for some inspiration? Hop on over to Grosgrain and you'll find lots!

April 21, 2011

Dedicated to the Nasty Taxman

This week's Iron Craft challenge was titled "The Taxman". When I say those words I picture a scary man with big gnashing teeth snatching at my wallet so I thought it was appropriate to finally make this ridiculously cute scary monster pillow that eats teeth in exchange for money. A super big thanks to Ellen from The Long Thread for sharing the tutorial during Celebrate the Boy.


The Rockstar is teething again (hence the drooling in the photo below). The poor nut had both top teeth make their entrance in a three day time span. Ouch. This monster is dedicated to his mean but cute new teeth.


Side note from the Tooth Fairy to the Rockstar: This particular monster will spit out Canadian funds in the future, all the photographer had on hand for this snapshot was an American bill from the travel stash.

March 10, 2011

Fat Quarter Turned Tiny Bucket

Between teething and a nasty virus there hasn't been much sleep around these parts lately. I've been on a blogging hiatus (and a cleaning hiatus, and a sleep hiatus, and a... you get the pont) and I missed the last two Iron Craft challenges. Honestly haven't even taken time to look through the flickr pool to see what the others came up with. By the time the Rockstar goes down at night I have found myself staring at the TV in daze or passed out in bed waiting for the sound of a sad little man in need of his mama.

I did start on a little something for last week's Oscar challenge but it was last on my list of TO DOs and never made it to the top; I may or may not end up finishing the project but if I do I'll be sure to share it with you. I do intend to post a roundup of my fav bits from challenge 8 and 9 still, hopefully within the next 24 hours.

On to this week's challenge!! The challenge was to use a fat quarter (18 x 22" piece of fabric) to create a little something. I've been itching to make some fabric buckets and I found a tutorial for a tiny one over at Ric Rac that required the exact amount of fabric needed (I adjusted the measurements so it was right on, otherwise I would have been over by a couple inches). I was pretty pleased with myself until just now... I may have broken the rules: is interfacing considered fabric? I'm going to say NO.

I heart this little bucket!! It's the perfect size to hold my fabric painting supplies. I can totally see myself making these little puppies to hold a bib, burp cloth and change pad for future baby shower gifts. I'm also thinking of making a bunch of them to hold the Rockstar's tiny toys (balls, cars etc) - wouldn't this be cute with some freezer paper stenciling or an applique?? Oh the possibilities!

Pop over to Iron Craft to see what everyone else has been up to this week!

February 5, 2011

Top Picks for Iron Craft Challenge #5

I couldn't narrow it down to three this week so here are my fav four from the Be Mine Iron Craft Challenge this week.

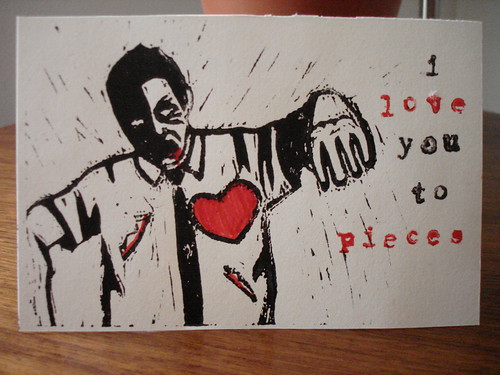
Fantabulous zombie valentine from My Pursuit of Craftiness - Mike would looooove this.
Extra awesome because the zombie is a hand carved stamp modeled after her husband. Check out her blog for more details.

My Zombie Valentine


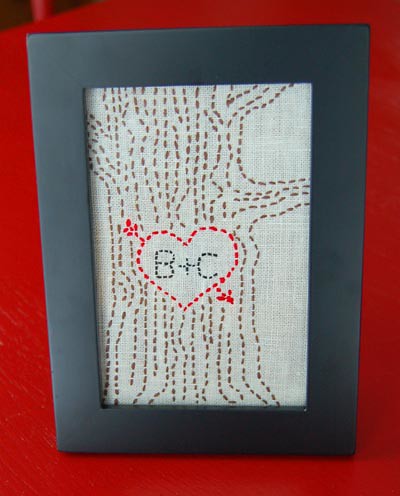
I am definitely going to try my hand at embroidery this year and this project looks like something I could handle! Love the design and the fact that The Modern Lady has shared her pattern over here.

The Modern Lady Heart Tree Carving Embroidery Picture


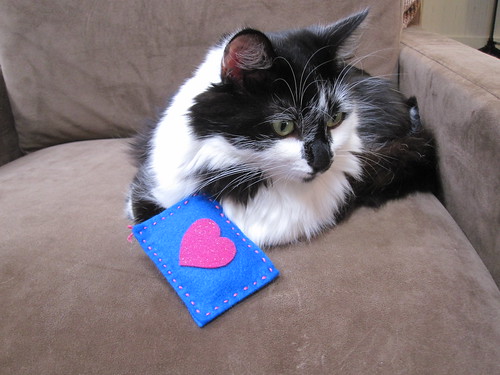
Kitties need love too. Subliminalrabbit made some super sweet catnip toys for her feline friends.

Iron Craft #5: Be Mine

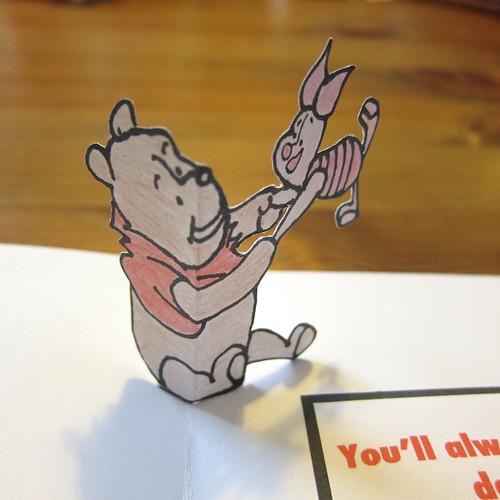
Definite pop-up card inspiration created by Kat. More pics of this adorable card with a fantastic tutorial can be found here.

Iron Craft Challenge 5 - Pop-Up Valentine

Next week's theme is WINTER. Still trying to decide what I'm going to make and looking forward to seeing what everyone else comes up with!

January 23, 2011

Boys Boys Boys!!

Boys sign
Anyone who sews or crafts and has boys in their world will know that finding tutorials and projects for cute boy bits online isn't the easiest thing to do. There are zillions of adorable sparkly, ruffly, sweet girlie bits to be found but not so many awesome boy goods. This is where Celebrate the Boy swoops in and comes to the rescue. Last year over at Made there was a month featuring BOYS: loads of tutorials, giveaways and links relating to fantabulous things for mini men. Click here to see the archives and find lots of fab tutorials.

The only thing better than Celebrate the Boy's well laid out archives would be a second round of celebrating, don't you think? Well lucky us! Dana from Made and Rae from Made by Rae
are preparing for round two of Celebrate the Boy. I can't wait for February 15th to arrive so we see what they have in store for us!

January 20, 2011

Challenge 3 Favs

There were so many fabulous buntings submitted for the Iron Craft challenge this week! I'm thinking I'll create a post featuring my three favourite Iron Craft entries following each challenge. Hopefully some will include tutorials: two of the three I'm featuring today do! Yippee!

Alright so here we go: my favs from Just Bunt and then I promise you I won't type the word BUNTING for at least a week.

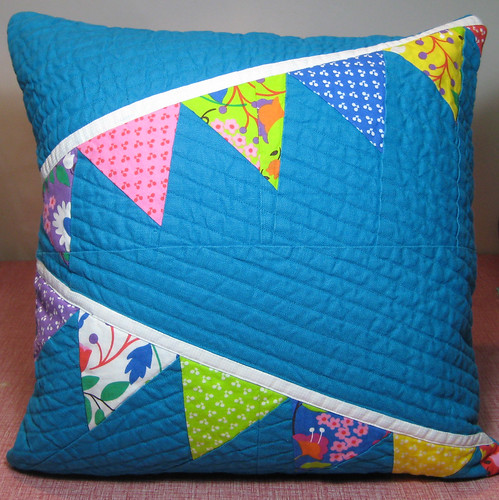
Amy from Glitter, Vinyl and Thread made this stunning pillow and bonus: it's up for auction! Hop over to this post on her blog and leave a comment with your bid to get in on the action.
All proceeds will be donated to the Queensland Flood Relief via Make It Perfect (worth checking out the master list here to see the loads of awesome bits available to bid on).

front


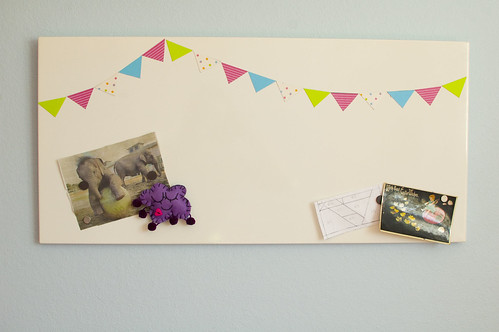
This magnetic bunting was made by Chrissy from Hickety Pickety and I think it's my favourite entry this week. Lucky us!! Chrissy created an easy to follow tutorial so you can make one of your own. I'll be revisiting this tutorial eventually so that I can make a mini bunting for the magnetic board that will be going up in my studio (once the room is painted and revamped - assuming this happens in my lifetime)

magnetic bunting

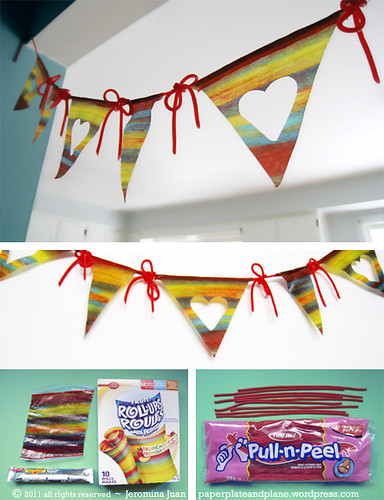
Yum yum YUM!! A bunting made of candy?! No further explanation necessary. Oh, but I should mention that this amazingly brilliant piece of work was made by Jeromina from Paper, Plate and Plane and if you slip over there you'll find a tutorial p.s. loving her blog

Edible Bunting (100% candy!)

Fabulous work ladies!

January 17, 2011

Buntings on the brain

This week's Iron Craft challenge is to make a bunting. I thought I was finished my project already but then Mike made a comment (he hadn't noticed a key element until I pointed it out) that made me rethink things and I'm now going to disassemble and fix it before saying it's complete. For me this is a big deal, I tend to take the easy route with my crafty bits and even if I'm not 100% happy with it I'll settle with a mediocre finished product just to be done with it. I want to stop that bad (for me) habit and this is the perfect opportunity to start.

Since buntings are running through my head I thought I would share a few cute tutorials I've found for those non-sewers out there who might want one of their own.

How About Orange shows you how to make a sweet little card with a teeny tiny bunting


Lil Blue Boo shares an easy no-sew bunting tutorial


A super cute Anthropology inspired leather bunting necklace tute over at Mandipidy

I lied, they aren't ALL no-sew tutorials. The last one involves sewing and it's not a tutorial but it's super cute so I had to share. A bunting quilt found at Little Birdie Secrets: LOVE this


Have you found any cute buntings online? Share them, please!

January 5, 2011

If I was 5...

I would want this dollhouse.

And if I was honest I would have left out the "If I was 5" and just said "I want this dollhouse."

Honestly this is the sweetest (in every sense of the word) dollhouse I have ever seen and it didn't cost $300 like the one I was eying in a children's boutique over the holidays (and that was for just the house). Hop on over to Darlybird (a new blog love) for more pictures and tonnes of tips on how to make a little house similar to this for your little people. I'm thinking a boy version may be in my crafting future.

October 10, 2010

Buy One Superhero Get One Free


Kian's still too little to fully appreciate the awesomeness of this tutorial but one day he will. Whipping up a superhero cape is a pretty simple task but Kelly from Sewing In No Mans Land took it up a notch by creating a two-in-one reversible cape: brilliant!

September 4, 2010

Kids on the brain

There are so many well written tutorials out there for kick ass bits for kids. Here are a few I've tagged lately with the hope of whipping up sometime soon.

photo snagged from I Am Momma - Hear Me Roar

I Am Momma - Hear Me Roar is such a fantastic blog. I visit daily now to get my fix. One of her recent tutorials that I'm dying to make for the Rockstar is for the Upcycled Boy Hat seen above. Ear flaps are just too cute and I can totally see the Rockstar in a mini version. I think a trip to Value Village is in order - I need to snag some t-shirts to shred.

photo borrowed from homemadebyjill.blogspot.com

ADORABLE baby jean skirt from Homemade by Jill (love love love this blog) featured on a new for me blog Kojo Designs which is run by two very creative sisters. Too bad Mike won't let me put a skirt on the Rockstar: no sense of adventure. Kim, I'm sending girl vibes your way so that I have an excuse to make one of these teeny tiny skirts.


photo borrowed from Living with Punks

I was hunting for a tutorial for floor cushions and came across another fabulous blog that I have added to my list of places to visit often. Living with Punks: awesome blog with fantabulous tutorials. This kid size floor cushion has been added to my ever growing list of things to make: might whip up a couple for Christmas presents and am definitely going to make a few larger sized cushions for the deck.


photo borrowed from Thimble

Maybe I'm behind the times but I didn't know that wannabe chalkboard fabric existed! If you're out of the loop too yes it is fabric you can draw on with chalk. Genius! Love this little travel roll-up chalk mat found on Thimble. Such a simple project. Hmm, a potential Christmas gift for a couple little ladies I know.

April 24, 2010

For the Make-up Fiend in your World

I love finding tutorials for pretty bits that I know will make a perfect gift for a specific someone.


This awesome cosmetic brush case was created by Juliette over at Chickpea Sewing Studio. The best part of all? She created a tutorial for Sewing Republic and you can find it and make use of it for free right HERE.

This is being added to my Christmas creation list for a certain make-up addict in my world.

April 11, 2010

30 weeks!!

The countdown is on now!! 10 weeks until the estimate date of arrival: YIPPEEEE!!!

It's official: I can't see my feet. Or maybe it has been official for awhile but I've just finally noticed.

I've had this belly ramp effect happening since the beginning and thought it would round out as time went on... apparently I thought wrong. It's kind of like I have an extra bump. I also thought I would gain a booty during pregnancy and that has yet to happen. I'm not complaining, just commenting!


We started our prenatal class this week and watched our first birth video - thankfully it wasn't as horrible as I imagined it would be and Mike said the same thing. Some people seem really surprised when I say I haven't seen a birthing video and I say WHY THE HELL WOULD I WANT TO WATCH A BIRTHING VIDEO JUST FOR KICKS?! Sometimes ignorance is bliss.

There are just two other couples in our class; both are total hippies and seem very sweet. Awkward moment: my lack of ability to hide my true feelings shone through when one of the girls decided to share with us how her friend who lives in the States BBQed part of her placenta "like a steak", made a smoothie out of a chunk of it and then buried the rest under a tree. What the hell?! Needless to say my mouth dropped open, I said something along the lines of "OH MY GOD" (I think it was out loud but it might have been a scream in my head) and then stared at her in utter horror. The second couple kept glancing at each other and smiling and I'm not sure whether they were trying not to laugh at my look of disgust or the story. The girl telling the story then assured us that she was NOT planning on BBQing her placenta. I managed to shut my mouth and stared at the instructor until I regained my composure - I was afraid to look at Mike for fear of bursting into uncontrollable giggles which would have been a) RUDE and b) very immature which of course I am not. hehe. When the baby arrives one of my rules is no dropping in without calling first so if you break the rule and show up without calling I'm liable to insist you stay for lunch... and guess what, I'll be BBQing something special.

I've been spending loads of time researching cloth diapers and I'm excited to have made a decision on how we're going to start this crazy adventure. There are SO many cloth diaper options available and it's all a little overwhelming; we really want to give this a go and I know things are going to be INSANE for the first couple months so we're going to use disposable for the first week or two and then we'll go with Bear Bottoms (a cloth diaper service in our area) for a month (thanks to a gift from my Mom & Dad - THANKS MOM AND DAD). While we're using the diaper service (they use fitted cloth diapers) we'll try out a few other styles/brands and figure out what is going to work best for us.

My hope is that Indian Prefolds from Green Mountain Diapers will work for us but of course we won't know until we try. Indian Prefolds are similar to the old skool cloth diapers but they are quilted to absorb more liquid and come in different sizes so you don't end up with a lot bulk. I've read loads of good reviews about these prefolds so fingers crossed!! I'll place an order for these in a couple weeks.

I spent hours this weekend researching diaper covers and have placed an order for three through Homestead Children's etsy shop; we'll need covers while using the diaper service so even if the prefolds don't work out for us and if we decide to go with All In Ones these covers will be put to good use and then we can sell them. I also found an AWESOME tutorial for cloth diaper covers with gussets that I'm going to try to work with in the not so distant future. If I can make my own covers that would be fabulous!

This post might have some of you yawning: sorry!! I could go on and on and on about cloth diapers because I've been reading about them FOREVER but I'll stop now because I have a baby ramming me in the ribs making it VERY difficult to type and it's time for bed anyways. Good night, everyone!

April 7, 2010

The nesting instinct is creeping in and when I'm not curled up in a ball on the couch I'm trying to get some things in order for our little guy. This weekend I finally made use of one of the bib patterns I've had bookmarked FOREVER. Chickpea Studio's pattern is perfect for tiny people and it's free so if you're looking for a pattern check it out.

Here are the bibs I whipped up for our guy, they were a SUPER easy and SUPER quick project.
The girlie bib is part of a shower gift.


The other little bit I made for Smidge is this change pad thanks to Homemade by Jill's easy to follow tutorial. I made some changes which I explain in more detail over at Gingham Skies if you're interested.

I'm looking forward to creating a few other things this weekend. Sewing for baby is the best kind of sewing.

April 5, 2010

Baby Bits from Fab Tutorials

I've been meaning to make some bibs for the baby and FINALLY got around to it on Saturday. I used Chickpea Sewing Studio's free pattern because I liked the size and shape. I would definitely recommend making bibs to beginner sewers, they're a super quick and easy project. These bibs are small so they'll be perfect starter bibs for our wee one.

I made a couple flannel front bibs with some sweet boy prints (backed with upcycled cotton from some of daddy's old plaid shirts so technically these are reversible).


And I made a few others with sweet cotton prints and backed them with a super soft furry fabric that will feel good against bare skin in the warmer months. The one on the right is not not for our little man, it's part of a shower gift. I made one of the bike print bibs for our man and one for his buddy Reid.

This is an easy project and a great way to use up some medium sized fabric scraps.

Tonight I finally got around to sewing one of Homemade by Jill's change pads which was featured during Made's Celebrate the Boy month. This was a fabulous tutorial and I have no doubt I'll make more of these change pads for shower gifts.

I made a few minor changes, some of which I'll stick with for future pads and some that I won't . I used 1/4 inch bias tape because that was what I had on hand and it was a bit tricky to deal with, next time I'll use the 1/2 inch tape that was recommended. If you're not sure how to work with bias tape Jill provides easy to follow directions in this tutorial.

I didn't use the suggested laminated cotton for the inside of the pad (part where baby lays), instead I used a soft vinyl which I will definitely use again. I like working with this vinyl and the texture isn't as grainy as laminate (I think it will feel better against baby's bare skin).

The tutorial suggested fusible fleece for some padding between the cotton exterior and the vinyl (laminate) layer but I improvised here and used what I had on hand (not sure what it's called but it's fairly plush and it worked well).

Excuse the crappy pictures, I wanted to post these tonight and the lighting was blech.


For creating the closure I didn't have proper belting so I used a couple pieces of white vinyl, I think I'll use belting in the future since it will hide the stitching around the velcro a little better but the vinyl worked okay.

I'm hoping to make a few more bibs this weekend and a few baby sleeper gowns too so hopefully I'll have some more goodies to share with you soon!

February 15, 2010

Celebrate the BOY

Mike has been patiently listening (or at least pretending to listen) to me whine about how few tutorials there are for cute boy bits and then TA DA, I pop over to one of my fav blogs MADE and found a little piece of boy heaven. A month devoted to celebrating BOYS!


Thank you MADE for giving me hope and for saving my man from the sad sounds of a disgruntled wife.

February 10, 2010

Tutorial Heaven

photo credit: pillowhead designs

If you love crafting/sewing you need to check out The Long Thread. Heaps and heaps of fabulous tutorials!

January 10, 2010

Carrier Covers

Cara and I took a trip to The Baby Depot on Friday, I wanted the opinion of a fantabulous shopper/friend who has recently been through the mommy-of-an-infant stage.

One of the things we looked at and spent some time discussing was baby carriers. Cara highly recommended the Baby Bjorn for baby's first three months - she found that it was one of the few carriers that allowed her to carry Rosie upright when she was eensie weensie. Once the Roser started packing on the pounds the Bjorn didn't provide enough back support so Cara moved on to the Ergo which has a padded strap that locks around your hips; the strap on the hips allows your hips to support some of your baby's weight rather than all of it falling to the middle of your back. There was a carrier similar to the Ergo at The Baby Depot but I want to hold off on spending a good chunk of change on a carrier until the baby is here - want the little nut to test drive it before I leave the store.

A Baby Bjorn will definitely be in our not so distant future, Cara recommended checking Kijiji or Ebay for a carrier since they're over a hundred bucks in the stores and a quick peek at Kijiji proved that she is one smart cookie: there are a pile of them being sold in my area for $15-50 bucks.

Of course I'll give the used Bjorn a good wash when we eventually purchase a used one but I think I might also make a custom cover for it because Lucky Kitty posted the link to a FAB tutorial that looks super easy!

I'm going to start sewing for baby VERY soon! There are so many fun things waiting for me to make them.

December 27, 2009

Handmade Goodies for the Wee Ones

I am trying to keep Gingham Skies from being a baby blog since Just a Smidge is my baby zone but since I haven't been posting a whole lot I thought I would share a few tutorials that have caught my eye while in babyland.

Not a big fan of store bought mobiles? Ditto. Check out this awesome and relatively simple DIY birdie mobile at Spool Sewing:

photos via Spool Sewing


Simple and much cheaper than store bought baby leg warmers tutorial at Everything Your Mama Made and More:


Cloth Shoe pattern from Stardust Shoes, these are uber cute:

photo credit: stardust shoes


And finally a not necessarily baby related tutorial: fabric boxes from The Sometimes Crafter! I'm adding them to this baby tute list because I think they would be a sweet addition to our nursery to hold extra bits of this and that which are bound to be found:

Sew Tweet

I am in looooove with these little birdies and have every intention of making a bunch for Smidge's room, I think I'll make a mobile with them.


I found this awesome tutorial here at a new for me shop/blog Spool.

September 20, 2009

Pretty Up Your Walls

Image via Purl Bee

Have some stellar fabrics that you want to display? Check out these sweet Swatch Portraits by the Purl Bee - the how to can be found here. I'm dying to get my hands on the fabric with the pink birds and yellow flowers, I'm off to hunt for it now!